Tuesday, 21 December 2010

Last Christmas

I have been a bit too busy this year to make anything special for christmas, so I here are a few things from last year.
Here is how I make a wreath. I begin by intertwining the most bendy but strong wood I can find, in this case Dogwood.

Then I begin to add foliage, such as eucalyptus leaves and pine tree sprigs, by threading their stems through the circle of wood.

I keep adding different greens until it is a decent size.

Red berries were then added to the wreath to give it more colour. You could also add ribbon, bows or little beads and baubles to the wreath to make it more interesting.

Last christmas I had a go at making a christmas stocking, insired by Kirstie Allsopp's Homemade Christmas TV show, and I followed her tutorial. However, as usual, I didn't measure things as accurately as I should have, so I ended up with a rather skinny stocking, which is merely ornamental as its too narrow to fit anything in it, apart from perhaps a chocolate coin or two.

I also had a go at making mince pies.

Finally, here is a pretty photo of some red berries. Merry Christmas!

Sunday, 19 December 2010

Shoe makeover

I really liked the shape and feel of these purple suede shoes, but I wasn't very keen on the colour. They were on sale so I decided to snap them up and give them a makeover.

I used Dunelm black fabric paint and began painting my first coat. I didn't want to dye them because I didn't know how the suede would react to dying. You can see a scuff mark on this shoe which I got after wearing them once, so the light purple colour doesn't seem very durable.

This is how they looked after one coat. The purple still showed through so another coat was needed.

Here they are after two coats. I could probably do with giving them one final coat, but for the moment I like the result. Although I still liked the purple colour the black is much more practical and versatile.

The fabric paint worked well on the suede. The purple zip on the inside of the shoe has been left untouched and adds a bit of variety to the shoe.

Monday, 13 December 2010

Unicorn Embroidery

A dear friend of mine bought me 'Making Stuff: An Alternative Craft Book' for my last birthday. Its a very useful book, with not only sewing projects but also knitting, origami, and much other things that I still need to try.

The first project that caught my eye was the unicorn embroidery project. The book gave an example of the unicorn as a motif on jacket, and also a temptlate of the pattern.

Having made a camera case out of felt I thought it could do with being jazzed up a bit, so I embroidered the unicorn on the back of the case. I'm very pleased with the results, and it was simple to do, and I bought a big pack of embroidery thread from a pound shop, so it was cheap to make too!

Sunday, 5 December 2010

Portable Hard Drive Cosy

My new portable hard drive needed a cover to protect it from getting damaged in my bag, so I collected some of my favourite flower print fabric, white felt, bead, lace and tape, and set about making a cosy.


This is where I was going to have a glorious tutorial to show you how to make one for yourself, but unfortunately I got too carried away making this at 11pm last night and forgot to take any photos as I went along. So here is a close-up of the fastening instead:

The hard drive fits snugly inside it, and the fastening keeps it from falling out.

I used the same ruffled lace technique that I used on the clutch I made a few weeks ago. I'm considering adding a flower or applique to the bottom corner, but I don't want to make it too fussy.

Saturday, 4 December 2010

Grey Ruffle Top

The ruffles on this top were made by folding the fabric, which I had sewn into a long rectangle, into pleats onto the neckline on one side, and sewing it together by hand.

Thursday, 25 November 2010

Ruffle Dress Recycling

I was given this dress by a good friend, but when I got it home I realised that it wasn't really my style.


The fabric was so gorgeous and silky I couldn't let it go to waste, so I cut off the ruffles and made it into a top, and brought the sleeves in a bit.


The ruffles are now waiting to be turned into a cushion, bag or skirt...

Saturday, 20 November 2010

Clutch

This clutch was made using a flower print fabric with a white plain lining, a magnetic fastening, and a lace trim, for a friend as a birthday gift. Magnetic fastenings are so much easier than zips, which I have yet to master.

Tuesday, 16 November 2010

Pearl White Brooch

This brooch is very similar to the first one I made, but I used a pearl in the centre instead of a button, and I didn't put felt on the back. I much prefer the one with the button as it gives the brooch a little more colour and depth, but the pearl is more neutral which makes it very versatile.

Wednesday, 10 November 2010

White Brooch

This is a mini-tutorial for a white brooch, pictured here on a some blue fabric that I shall later use to cover a book.

This brooch is made by cutting out circles of fabric that gradually decrease in size.
The edges of the fabric are then put over the flame of a candle which makes the fabric melt or burn slightly (but be careful not too put it too close to the flame or it will catch on fire). This makes the fabric curl up at the edges giving it more texture and depth.
The pieces of fabric are then sewn together through the middle onto a brooch fastening.
I then added a gold button, but any button or jewel can be used, making it a quick and versatile project, perfect to be given as a birthday gift.

Monday, 1 November 2010

Purple silk skirt

To make this purple skirt I bought some 'shirting' material and gathered it at the top and sewed it onto black elastic. I then sewed up the seam at the back.

It was very easy to make, the only problem with it though is that the silky material creases very easily. I love the shape of it because its so different to the usual bodycon style skirts I normally wear.
Here I am wearing it with a black ruffled top which I also made.

Saturday, 30 October 2010

Birthday Card Embroidery

I loaned a sewing book from the local library called "Sew Fabulous Fabric" and in the back of it were various templates of flowers and animals. I traced one of the flower templates onto some material and embroidered it with green and purple floss.


I then simply pritt-sticked the material onto some card. I love how fast and easy it was to make- everyone can expect only homemade cards from me in the future.

Summer Dress Alterations

I was given this dress but didn't like how the waist of it made me look pregnant!


The dress had two strips of the same fabric on each side to tie into a bow at the back. I cut each strip off and used it to add two more rows below the original row, like so:


I sewed these down and was ironing them flat when I burnt a hole on all three rows, RIGHT in the middle of the dress. I was so annoyed- I'd spent ages sewing them and now it was ruined. Or was it?...

I luckily had some of the strips of fabric left over so I sewed them vertically over the burnt patch, only just covering it:


I much prefer the dress now, the strips around my waist make the dress more fitted, and then it has a nice puffing-out skirt. Its a shame I never had a chance to wear it this summer.

Ruched Bodycon Dress

I loved the Topshop ruched/bandage bodycon dresses this summer, like this one below, but thought I could make one myself pretty easily and save around £35!


I bought some navy blue voile fabric for under a fiver and a zip and set to work. I made a plain dress to start with and then added layers/bandages of strips of fabric over the top of it to make the ruched effect, and to make it less see-through. This was harder than I anticipated as it was difficult to get the strips of fabric to fit perfectly, and I made a bit of a mess near the zip. Which is why I put the zip to go down my side instead of my back- to hide all the freying edges.

I'm pretty happy with the result. Next time I make one I'd put the strips of fabric onto a white dress underneath, like how Topshop did, because I think it makes the ruched-ness of it stand out better.

Friday, 29 October 2010

Duct Tape Dress Makers Dummy

I decided that I needed to get a dummy or mannequin so I'd be able to make tops and dresses more easily. After looking on ebay and seeing they cost upwards of £50, I tried an alternative.
A quick search found quite a few methods for making a duct tape dummy of my own body.

Using two rolls of duct tape and an old hairdye-stained t-shirt I was able to make one. Well, it actually takes two people to make as one person has to wrap the tape tightly around you while you slowly begin to feel very claustrophobic and unable to breathe.


Then there is the most difficult part where you have to cut down the back of the dummy, through the tape and the t-shirt, and painfully close to your skin. Then it will look something like this:


The next step is to stuff the dummy with screwed up newspaper and tape the back together:

The dummy is then ready to use, like so:

Bedroom Painting

I painted a canvas for my bedroom. The flower shapes were traced from some wallpaper samples. Even though its a fairly large canvas I think I need an even bigger one for it to suit my bedroom, and perhaps next time I will do a more abstract design.

Monday, 23 August 2010

Key Bag

I made this little bag so I could keep keys all in one place within a drawer.


The fabric is from a free swatch and the bead was part of an old necklace, with part of a hair bobble hooked over it to keep the bag closed.

Monday, 19 July 2010

New Shoes

I bought a pair of shoes from Primark but realised afterwards that I wasn't too keen on them being bright blue.

So I got some Dunelm fabric paint in black and painted them with one cover, and then ironed to make sure the paint doesn't wash off. You can still see the flower design through the paint but I like this because it makes them less plain.

Thursday, 3 June 2010

Blackberry Cover

This is a cute holder for my friends mobile phone, using a purple silk fabric lined with white felt, with a velcro fastening.

I particularly like the ribbon tied through the button, I prefer it to just having the button on by itself.

Wednesday, 5 May 2010

Desk Organisers

I found this tutorial and decided to have a go myself because I had an abundance of stationary that needed to be organised.

I washed a tin can, then I cut the wallpaper to the right height to fit on the side of the can, and I used cellotape down the edge to secure it. I thought it looked so good that I wolfed down another tin of baked beans and made another one.

Monday, 3 May 2010

Gift Bow

I found instructions for how to make a bow to put on gifts here, and though I'd have a go and I'm very impressed with my effort.

I used brown paper but I think it would probably look good using any paper or even spare wallpaper that has a nice pattern.


Saturday, 1 May 2010

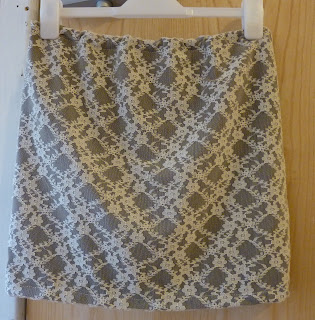
Tutorial: Lace Skirt

I'm going to show you how to make a lace high-waisted skirt.

You need:
Lace fabric
A plain fabric, to go behind the lace, which can contrast or match the lace colour (unless the lace is not see-through in which case you would not need a backing fabric)
Elastic for the waistband
Sewing machine, scissors, pins, tape measure, thread.


Start off by cutting the fabric. Cut both pieces together and fold them in half.

I used a skirt I already had as a template, and cut it a couple of inches larger to allow for seams.

Or you can measure the height and width you want the skirt to be and measure the fabric to fit, again leaving extra room for seam allowances.


Fold over the top of the fabric and pin it to make a seam at the waist. Make sure that you leave a wide enough gap so that your elastic will fit inside it. Sew it using a medium running stitch.


Fold the skirt in half with the right sides of the fabric facing eachother (the right sides being the outside- the part people see) and pin it to create a seam to go down the side of the skirt.
Thread the elastic through the waist seam at this point and then sew over it as you sew the side seam.


Try the skirt on and if it is too large then sew it again a bit smaller. I also add curves to the top and bottom of the seam so it fits better. Then trim the excess fabric off.


Finally, turn over the fabric at the bottom to create a seam, pin it, and then sew it. Make sure that the height is the same all the way around the skirt before you sew it.


Et voila! A high-waisted lace skirt.