Sunday, 13 February 2011

Valentines Cupcakes

The majority of my Sunday afternoon was spent making cupcakes with a friend. Well actually, the vast majority of it was spent making sure said friend hadn't got icing in her hair or let chocolate melt on the underfloor heated kitchen tiles (and failing on both accounts).

We used a simple fairy cake recipe for most of them, and then made an extra batch of chocolate ones with a gooey chocolate centre.

We decorated them with various icings and plenty of colourful toppings such as sugar balls, hearts, glitter, chocolate curls, cherries, jelly babies, hundreds and thousands and strands.

My favourites have to be the ones with a cherry sat on top.

While my friend utilised sweethearts to make them more valentines-ish.

I'm going to have to wait a while before I try one because we got too full eating cherries and licking spoons as we went along.

Sunday, 6 February 2011

Bird seed buns

I bought some bird seed the other day but didn't have a suitable bird seed feeder for it so I decided to make something with the seed that I could hang straight off the tree.
Mixed with the birdseed was a tablespoon of flour and two tablespoons of water.

The mixture was then put into silicone bun cases. Other peoples blogs have made something similar lately, and they instruct you to put a straw in the mixture to create a hole for string to thread through.

Well, after 15 minutes in the oven the straws melted: no-one had warned me of this happening! So I removed the straws and baked for another 15 minutes.

Once they had cooled I was able to thread ribbon or string through them and hang them outside.

I just hope the birds manage to get to them before our chickens do!


Culinary masterpiece and disasterpiece

I really got into Jamie Oliver's 30 minute meals a few months ago so I tried out his idea for a refreshing pomegranate drink, involving pomegranate, ice cubes, mint, lemon and sparkling water. It looked really nice but you couldn't taste the pomegranate, so I spruced it up with a dash of elderflower cordial.The masterpiece was this chocolate delight I made using various nuts, biscuits and marshmallows that set in the fridge. I like to think its similar to the Hotel Chocolat slabs you can buy.
Finally, the disasterpiece below is a piece of puff pastry topped with tomato puree, tomato, pepperoni and cheese. Even though I pricked the pastry in the middle in order to prevent it from rising it still decided to create a massive pocket of air that rose up and caused all the topping to slide to the edges, leaving one lonely piece of pepperoni in the centre. When it cooled the air bubble disappeared and I had to shuffle the topping around to make it more even, but it tasted amazing. I'm definitely going to make more of these and experiment with different toppings, and hopefully sort out the air bubble problemo.

Saturday, 5 February 2011

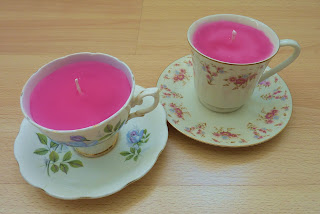
Teacup Candles Tutorial

Two of my favourite things in the world are teacups and candles. So when I saw a teacup candle in a Laura Ashley store I had to have one, but without the £18 pricetag. So I found a teacup and saucer set for 40p at a carboot, and one for £1.50 at a local second hand shop, and then headed to ebay where there were teacup candle kits for under a fiver with everything you need in them (wax, wick, wich holder, dye chips).

To start with you need to measure how much wax you need by weighing the teacup and then filling the teacup with water and weighing it again. Then you subtract the weight of the teacup from the weight of it with water in, and that is how much wax you need.
Melt the wax in a double boiler- where you have a bowl over a pan of hot water (or according to your wax's instructions). Now this took ages for me, seriously AGES, and I was constantly scared that it was going to explode, but eventually it all melted. I then added the pink dye chips.

Meanwhile I prepared the two teacups. The wicks have to be dipped into the wax and held in place.

The kit I bought only had one wick holder thingy so I used a peg and bit of card instead.

The wax then has to be carefully poured into the teacups. Some of the wax has to be kept to one side to be used later.

When the wax starts to cool you can see the texture of the surface changing. The colour eventually becomes much lighter too.
Now, once the wax has cooled for hours and hours you then have to top it up with the wax you set to one side because the wax dips down aroung the wick. However, I was too impatient and didn't wait long enough for it to cool completely so I ended up topping it up a few times.

Its as simple as that- two teacup candles made for under a fiver (and you should have enough wax left over to do quite a few more too).
Tuesday, 4 January 2011

Purple Painting

This was painted before the previous red painting that I have posted, only this one is smaller and the background fades from purple to pink. The black flower shapes were traced from some wallpaper, because I can't draw freehand to save my life.

Tuesday, 21 December 2010

Last Christmas

I have been a bit too busy this year to make anything special for christmas, so I here are a few things from last year.
Here is how I make a wreath. I begin by intertwining the most bendy but strong wood I can find, in this case Dogwood.

Then I begin to add foliage, such as eucalyptus leaves and pine tree sprigs, by threading their stems through the circle of wood.

I keep adding different greens until it is a decent size.

Red berries were then added to the wreath to give it more colour. You could also add ribbon, bows or little beads and baubles to the wreath to make it more interesting.

Last christmas I had a go at making a christmas stocking, insired by Kirstie Allsopp's Homemade Christmas TV show, and I followed her tutorial. However, as usual, I didn't measure things as accurately as I should have, so I ended up with a rather skinny stocking, which is merely ornamental as its too narrow to fit anything in it, apart from perhaps a chocolate coin or two.

I also had a go at making mince pies.

Finally, here is a pretty photo of some red berries. Merry Christmas!

Sunday, 19 December 2010

Shoe makeover

I really liked the shape and feel of these purple suede shoes, but I wasn't very keen on the colour. They were on sale so I decided to snap them up and give them a makeover.

I used Dunelm black fabric paint and began painting my first coat. I didn't want to dye them because I didn't know how the suede would react to dying. You can see a scuff mark on this shoe which I got after wearing them once, so the light purple colour doesn't seem very durable.

This is how they looked after one coat. The purple still showed through so another coat was needed.

Here they are after two coats. I could probably do with giving them one final coat, but for the moment I like the result. Although I still liked the purple colour the black is much more practical and versatile.

The fabric paint worked well on the suede. The purple zip on the inside of the shoe has been left untouched and adds a bit of variety to the shoe.

Monday, 13 December 2010

Unicorn Embroidery

A dear friend of mine bought me 'Making Stuff: An Alternative Craft Book' for my last birthday. Its a very useful book, with not only sewing projects but also knitting, origami, and much other things that I still need to try.

The first project that caught my eye was the unicorn embroidery project. The book gave an example of the unicorn as a motif on jacket, and also a temptlate of the pattern.

Having made a camera case out of felt I thought it could do with being jazzed up a bit, so I embroidered the unicorn on the back of the case. I'm very pleased with the results, and it was simple to do, and I bought a big pack of embroidery thread from a pound shop, so it was cheap to make too!

Sunday, 5 December 2010

Portable Hard Drive Cosy

My new portable hard drive needed a cover to protect it from getting damaged in my bag, so I collected some of my favourite flower print fabric, white felt, bead, lace and tape, and set about making a cosy.


This is where I was going to have a glorious tutorial to show you how to make one for yourself, but unfortunately I got too carried away making this at 11pm last night and forgot to take any photos as I went along. So here is a close-up of the fastening instead:

The hard drive fits snugly inside it, and the fastening keeps it from falling out.

I used the same ruffled lace technique that I used on the clutch I made a few weeks ago. I'm considering adding a flower or applique to the bottom corner, but I don't want to make it too fussy.

Saturday, 4 December 2010

Grey Ruffle Top

The ruffles on this top were made by folding the fabric, which I had sewn into a long rectangle, into pleats onto the neckline on one side, and sewing it together by hand.