Two of my favourite things in the world are teacups and candles. So when I saw a teacup candle in a Laura Ashley store I had to have one, but without the £18 pricetag. So I found a teacup and saucer set for 40p at a carboot, and one for £1.50 at a local second hand shop, and then headed to ebay where there were teacup candle kits for under a fiver with everything you need in them (wax, wick, wich holder, dye chips).
To start with you need to measure how much wax you need by weighing the teacup and then filling the teacup with water and weighing it again. Then you subtract the weight of the teacup from the weight of it with water in, and that is how much wax you need.
Melt the wax in a double boiler- where you have a bowl over a pan of hot water (or according to your wax's instructions). Now this took ages for me, seriously AGES, and I was constantly scared that it was going to explode, but eventually it all melted. I then added the pink dye chips.

Meanwhile I prepared the two teacups. The wicks have to be dipped into the wax and held in place.

The kit I bought only had one wick holder thingy so I used a peg and bit of card instead.

The wax then has to be carefully poured into the teacups. Some of the wax has to be kept to one side to be used later.

When the wax starts to cool you can see the texture of the surface changing. The colour eventually becomes much lighter too.
Now, once the wax has cooled for hours and hours you then have to top it up with the wax you set to one side because the wax dips down aroung the wick. However, I was too impatient and didn't wait long enough for it to cool completely so I ended up topping it up a few times.

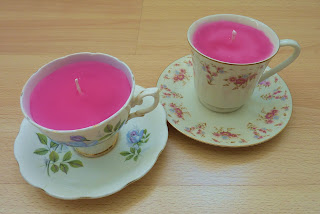
Its as simple as that- two teacup candles made for under a fiver (and you should have enough wax left over to do quite a few more too).
 I removed the old shade and was left with this.
 I then got some plain thick paper and some designer wallpaper of skyscrapers. I wrapped the plain paper around the lamp first and cut it out bit by bit to get the right shape, and then I used it as a template to cut out the wallpaper.
 I put the plain paper on the lamp first and then the wallpaper over the top, to make it a bit thicker, and simply used cellotape to secure it.
 I think it looks so much better and the wallpaper matches the room well. It was free too because the wallpaper was a sample.


